Showing posts with label fixing things. Show all posts

Sunday, March 25, 2012

Modifying a chinese wall wart for use in Europe

I ordered a USB hard drive case from Dealextreme some time ago, and forgot to check if it has a wall wart compatible with the finnish wall sockets. So of course I got some chinese wall wart with no way of plugging it in anywhere.

Luckily, it accepts the 230V 50Hz AC, it just doesn't physically fit in the socket...

One option would be to buy an adapter, but I couldn't find anything less than 35 euro. Also, even if I found some cheap adapter, it would probably cause power problems to the hard drive case, making the hard drive unstable. So I soldered an europlug cord on the wall wart.


The adapter and the cord, soon to be one.


If you do something like this, please don't have it connected to the wall when you're working on it. At least please don't sue me if some fucking idiot dies like this.

You need some heat shrink tube and a heat gun for this one, to hide the mains voltage connectors totally. You want to make this thing safe you know. If you don't have a heat gun, a hair dryer or a lighter might do.

Soldered together, with heat shrink tubing.

Heat shrink tubes in place.

After applying the heat gun.


A HUGE piece of heat shrink tubing...

At this point I learned that indeed, heat shrink tube shrinks. Especially with bigger tubes, you need to leave some extra length, because it will shrink also in length...

Didn't go as planned...


Fortunately, the heat shrink I had at hand fit over the europlug, so I didn't have to start all over. I put a bigger piece of heat shrink on top of the old one and used the heat gun again...

Even bigger piece of heat shrink. This should do it.

...and there we go. Works nicely and safe too!

Finally, ready for use!

Braun 1508 shaver battery replacement

This one might gross someone, but I don't give a f--k. If you're offended by imagery of decade-old greasy hairs - of dubious origin - go watch the disney channel.

I don't really use my Braun 1508 shaver that much, I prefer the 3-blade, but sometimes it's a lot of help when trimming the face in a hurry. I've had this shaver for over 10 years, and it's still working nicely for me - but the battery is now long gone. I've just used it plugged to the wall for like 6 years.


Finally, I decided to change the battery. It's just a 1.2V NiMH cell, you can get a new one from literally any grocery store. Here's a guide of how I did it.

First, TAKE OFF THE POWER CORD and keep it that way while working or you'll cease to exist. Then get the screen off and open the two screws on the side.

Open these screws...

After unscrewing them, you have to use some force to get the cover open. There's this white plastic locking mechanism with a spring in it, and that might break. My spring flew somewhere, and I couldn't find it, so in the end I just threw away the white piece of plastic and glued the shawer back together...

The 1580 opened up.

A view of the electronics.


This is the + side of the cell. Remember this. It's important.


...and the negative electrode is connected here.


I took away the cell with some cutters and a bit of force. It's glued in place.

Old cell ripped off the PCB, and the replacement cell.

Then I soldered some wires on the battery. Batteries shouldn't really be soldered on, since the heat will not do them good. But you probably don't have a spot welder at hand. Just use a soldering iron at maximum power and be fast, and it will be fine. The electrical connection doesn't have to be perfect, since it's a low-power circuit.


Wire soldered to the replacement Varta cell - negative electrode.
When soldering don't block the small vents on the positive electrode. They are there to release gas if the cell it overcharged. If they are blocked, the gas will build up and might result in an explosion when charging.

The positive side. Don't block the vents on the cap.

Then solder the wires to the PCB where the original cell was connected. Remember to solder it in the correct polarity, the same way as the original cell.


+ side

The - side.

That's it. Just put the thing back together and the shaver's like new! OK, maybe not brand new, but still, working.

It doesn't really make sense that you need to buy a new shaver when the battery dies. I quess it's partly a safety issue that they don't put a battery slot in the shaver, since it also has mains voltage inside... But mostly it must be the increased shaver sales they get due to dead batteries. So if you have any soldering skills, just fix the thing yourself. You'll prevent generating unnecessary e-waste and save some money from the greedy fingers of Braun.

F--k you Braun, I win.

Monday, June 20, 2011

Repairing a pitch bend wheel with style

These pics are from 2008. I had a Swissonic CK490 USB MIDI keyboard. It was a super-cheap controller with a lot of pots and 49 keys. The response was never very good with these things, especially with the velocity sensitivity, and it slowly deteriorated over time. It's enough for making some computer music, but I would never use this thing live.

Here is the keyboard before the repair. Or actually it's just a similar one. Notice the kitchen studio setup...

The Swissonic CK490. In a kitchen.

The keyboard was actually made by M-Audio, the former Midiman. The same keyboard has been marketed also under the Evolution brand. It's not as good as M-Audio products in terms of quality.

Since it was very light to carry, I used it for practicing quite a lot. At some point the pitch bend wheel stopped working, and the pitch of the whole keyboard became unstable. It was basically unplayable. The potentiometer had clearly given up.

So I decided to repair the wheel. After opening the thing and ripping the wheel out, I noticed it would be hard for me to find a similar linear 10k pot that would fit in. The two important properties were the physical size of the pot and how many degrees the thing rotated. Both would have to be exactly same with the replacement pot...

Don't pay any attention to the tablecloth. Please.

The modulation and pitch bend wheels ripped off from the CK490.

Closeup of the pitch bend wheel.

The pitch bend wheel in pieces.

Both the pitch bend and the modulation wheels used a similar 10k linear pot. After a bit of thinking I decided to use the mod wheel as the pitch bend wheel, and replace the mod wheel with just a normal pot. Since there was no spring in the mod wheel, I took that from the old pitch bend.

It worked great, and the new modulation pot didn't take a long time to get used to. It also looked great, see for yourself!

The result looks so f*cking ghetto!

Some time later, I sold the thing, as I had gathered some better keyboards. I wonder if it's still in use somewhere...

Thursday, June 16, 2011

Boss BR-1180 hard drive backup & replacement

The victim, a Boss BR-1180.

One beautiful day, while we were recording some gangsta rap our trusty home studio Boss BR-1180 gave up and went insane. After a reboot, the thing gave a HD read error. The beat must've been too fat...

So it was time to change the internal hard drive, and see if I can safely back up all our white ass beats from it.

In addition to this guide I'm writing, there's another repair guide on the net by some "PJ". It's a good guide, but it has some problems. You don't need to format the new hard drive, even though PJ's page claims so.

If you're planning to follow my footprints and change the internal hard drive, I recommend first updating the firmware of the BR-1180 to v.2.01. After the update, you can initialize one partition a time with it, which gives you a bit more freedom.

OK, back to the issue. Opening the thing wasn't too hard, just had to keep note of all the different screws on the thing. If you manage to mix them up, PJ's page has them color-coded.

Backside of the BR-1180... Why do I take these pictures?
All opened up...


The hard drive, with some foam to get rid of vibrations.
The hard drive has a nice suspension rack that's easy to open. Some silicone pieces minimize the movement of the drive in case the BR-1180 gets hit. The IDE and power connectors are covered with some plastic foam, to kill resonances and vibrations. You have to destroy part of it to get the connectors out. I carefully shredded the foam with scissors and knifes, spilling just a little blood.


The hard drive and it's metal holders.
The internal hard drive is a 5400RPM Matrox 541D Ultra ATA/100 Hard Drive with only 20GB of capacity. The drive is one third thinner than a normal 3.5" hard drive (only 17mm thick). There's no space for a normal HD in the BR-1180. If you can't find a small HD like this, you could just use a longer IDE cable, extend the power wires, and connect a hard drive externally! That would be AWESOME. Stupid, but AWESOME.


Close-up on the hard drive.

The hard drive can be easily read with an USB-IDE adaptor or hard drive enclosure. Or you could just shut down your PC and put it in the IDE bus, but then you might also need to make some changes to the HDD jumpers (to select master / slave / cable select).

My Black Box USB IDE HD enclosure has been well worth the 20€ I paid for it...
So I put the drive into my USB enclosure, plugged into my PC and there you go! A drive popped up, containing all kinds of cryptic files that I backed up to my internal HD.

Listing of the hard drive contents. The .BR1 directories contain the individual songs, and there's also some other shit.

You can supposedly turn the BOSS track files into WAVs with this piece of software. I haven't tried it out yet though. 

Properties of the BR-1180 hard drive.
 
The backup process took some time, but eventually it finished and there was no errors. So it looks like the HD is not totally dead yet.

I used chkdsk to correct errors on the old hard drive, just for fun (yea I know, I'm fucked up).

Correcting the old HD's errors.
There was 50 megabytes of lost information on the disk. I'm quessing it was the track that was being recorded at the time of the crash.


Even though the internal hard drive seemed to work fine now, it would be a good time to change to a new one to minimize any future troubles. I could also increase the HD space...

I happened to have a hard drive with similar dimensions at hand: a seagate ST340015A. This one is also an Ultra-ATA/100 drive and has twice the capacity of the original one (40GB). You could also use UATA/133 according to the comments on PJ's page.

The new HD, a thin one like the factory HD.

I plugged the new HD straight in. The HD had some old Linux Ext2 partitions on it, but that was no problem for the BR-1180 to format again. Again, you don't need to format the HD, the BR-1180 does it for you.

When I started the BR-1180, it asked "New HD, initialize now?". I hit no, since it would by default create a single partition on the HD. I have been experimenting with the partitions and it seems the BR-1180 cannot handle more than 20GB partitions. Or, you can use bigger ones, but only 20GB of them will really be in use.

So the best way to initialize the HD is to go to UTILITY -> HDD -> INITIALIZE and from there, select the format mode to be DIV 2, DIV 3, or so on, depending on how many partitions you want. Since I had a 40GB, I wanted to have two 20GB partitions, and I selected DIV 2.

Now initializing...
After the initialization, I checked the partitions from UTILITY -> HDD -> INFO, and two partitions, both 19072 megabytes in size, were listed.

Then I shut down the BR-1180, took the hard drive out, put it again to my USB-IDE enclosure and copied all the old files I had backed up from the old drive. I put the old stuff to the first partition and left the second partition empty as it is (or actually it has one empty song automatically generated by the BR1-1180).

After the copying was done, I put the drive back to the BR-1180 and voilá! I had the old stuff there, and an extra 20GB partition that could be used for new recordings. 62 hours more remaining recording time for free... nice!

Fuck you BR-1180, I win.
WHO'S THE BOSS NOW?

But still, one more thing to do: put some plastic foam around the HD like Boss had done. It probably reduces some resonances the hard drive causes. For this purpose I used an old mouse pad. What do we learn from this? Always have a couple of mouse pads ready, you can do anything with them!

Hard drive in it's place, before adding the foam.

After gluing the foam.

That's all, folks.

Related links:
Boss BR-1180 owner's manual
Boss BR-1180 owner's manual - addendum
Boss BR-1180 applications guide

PS. PJ, smoking around your equipment doesn't cause hard drive failures. I'm pretty sure the fag packs would have a warning sign for that.

Updating the Boss BR-1180 firmware

While doing some maintenance to a Boss BR-1180, I decided to update it's firmware. The device had firmware v.1.01, and the newest version, from 2004, is 2.01. You can find the update from Roland's downloads page.

You'll get many new features with this update. Especially if you're planning to change the internal hard drive to a bigger one, you should definitely update, since the v.2.01 can initialize separate partitions. You can check the full list of added features from this PDF.

The update .zip package includes a program that uploads the new firmware into the BR-1180 via MIDI. If you have the BR-1180CD model with the CD drive, you can also burn a CDR and update it that way. I did the update via MIDI.

Unpack the .zip and you'll get two directories. BR1180smfupd contains the new firmware and UpdSMFJ a program that can upload it.

Let's see what the UpdSMFJ readme says:
UpdSMFJ is a simplified SMF Player. This SMF Player is exclusively for update, therefore it cannot be used to playback ordinary music SMF data.


Update procedure:
1. Double-click the "UpdSMFJ" icon.
2. Set the MIDI transmit device in "MIDI Out Device".
3. For "SMF Path", assign the folder name that contains the 32 SMF data.
   You can also search for the folder with the [Path] button on the right.
4. Press [ScanSMF] button. *For Mac, this step is unnecessary.
5. The sequencer will playback all the SMF data inside the folder, therefore
   erase unnecessary data from the folder.
6. Press the "Send" button to playback SMF data in order

OK... Doesn't sound too hard.

And here's the info from the other readme:
** Update From SMFs

Tools Needed:
1.  BR-1180
2.  BR-1180 Update Files
3.  Sequencer Capable of Playing SMFs
4.  MIDI Cable.

* Procedure

1.  Connect the MIDI Out of the sequencer to the MIDI In of the BR-1180.
2.  While holding STOp, PLAY and REC, turn power on.
3.  When "Waiting SMF" is displayed, send all SMF data in numeric order.
4.  After all files are sent, "Complete" should be displayed.
5.  Power off unit and power on normally to complete upadate.


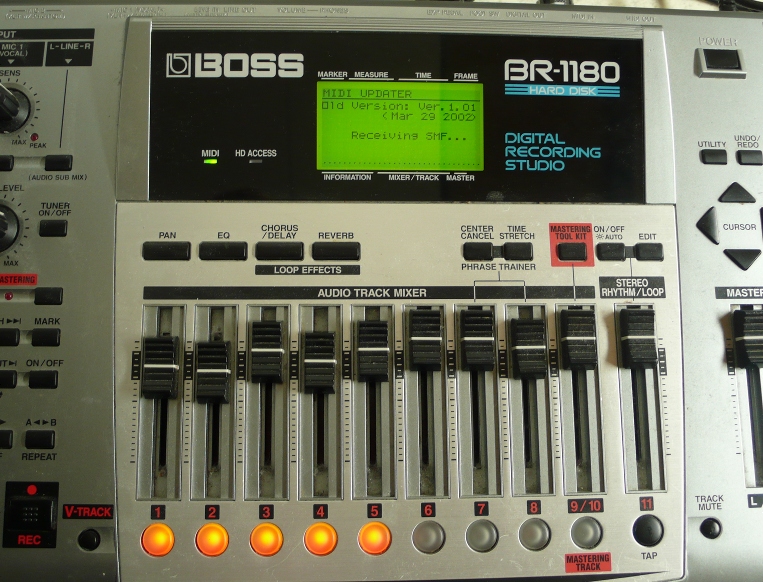
So, I wire the BR-1180 via MIDI to my PC, hold down stop, play and rec buttons and then start up the BR-1180. "MIDI UPDATER" comes up, waiting for the transfer via MIDI.


PC MIDI out connected to BR-1180 MIDI in.

MIDI updater waiting for the new firmware.

I then hook up UpdSMFJ with all the necessary info. I select my trusty old Soundblaster as the MIDI output device and find the path to the MIDI files. Then with the click of "Scan SMF" the update files appear in the list.


The backslashes in the path are a bit fucked up but I quess it's going to work...


Clicking Send starts the update. The process took quite a long time, like 15 minutes or so.


Updating the firmware...

All ready.

After it's complete, reboot the device and you can admire the beauty of the new startup screen.

Ver. 2! It's even animated.
K, that's it, best of luck!